Run Experiments
Iterative Studio can train your model and run experiments with different hyperparameters or datasets. Experiments can be
- Cloud experiments, that run on your own cloud, independent of your CI/CD setup, or
- CI-based experiments, that invoke your CI/CD setup for model training. The training can run on your own cloud.
Due to access restrictions, you cannot run experiments on the demo projects that are provided to you by default (such as the
example-get-started
demo project). Once you connect to your ML project repositories, you can follow the instructions given below to run experiments directly from Iterative Studio.
Cloud experiments
Cloud experiments are in alpha release and are subject to change.
Run your experiments on your own cloud compute instances in AWS, GCP, and Azure (coming soon). For this, you need to:
- Set up credentials for the cloud provider
- Create a DVC experiment pipeline in your project. Note that while the default script for cloud experiments runs a DVC pipeline, advanced users can run experiments without a pipeline by modifying the script.
- Create a
requirements.txt
file listing all Python packages required by the project. The default script for cloud experiments installs all requirements fromrequirements.txt
, although advanced users can specify requirements differently by modifying the script.
Submit a new experiment
Once you have added credentials, navigate to the project and follow these steps:
- Select the Git commit from which you want to iterate. Click the
Run
button at the top. In the form that opens up, switch to theCloud
tab to run cloud experiments. - At the top of the form, configure the cloud instance by selecting the cloud region, instance size, disk size, whether to use a spot instance, etc.
- Under the
Parameters
tab, optionally modify any parameters of your DVC experiment pipeline. - Under the
Script
tab, you can see the commands that will be run on the cloud instance. You can modify this script, although this is not recommended unless you know what you are doing, as it could cause the experiment to fail. - At the bottom of the form, click
Run Experiment
to start the experiment.
Monitor a running experiment
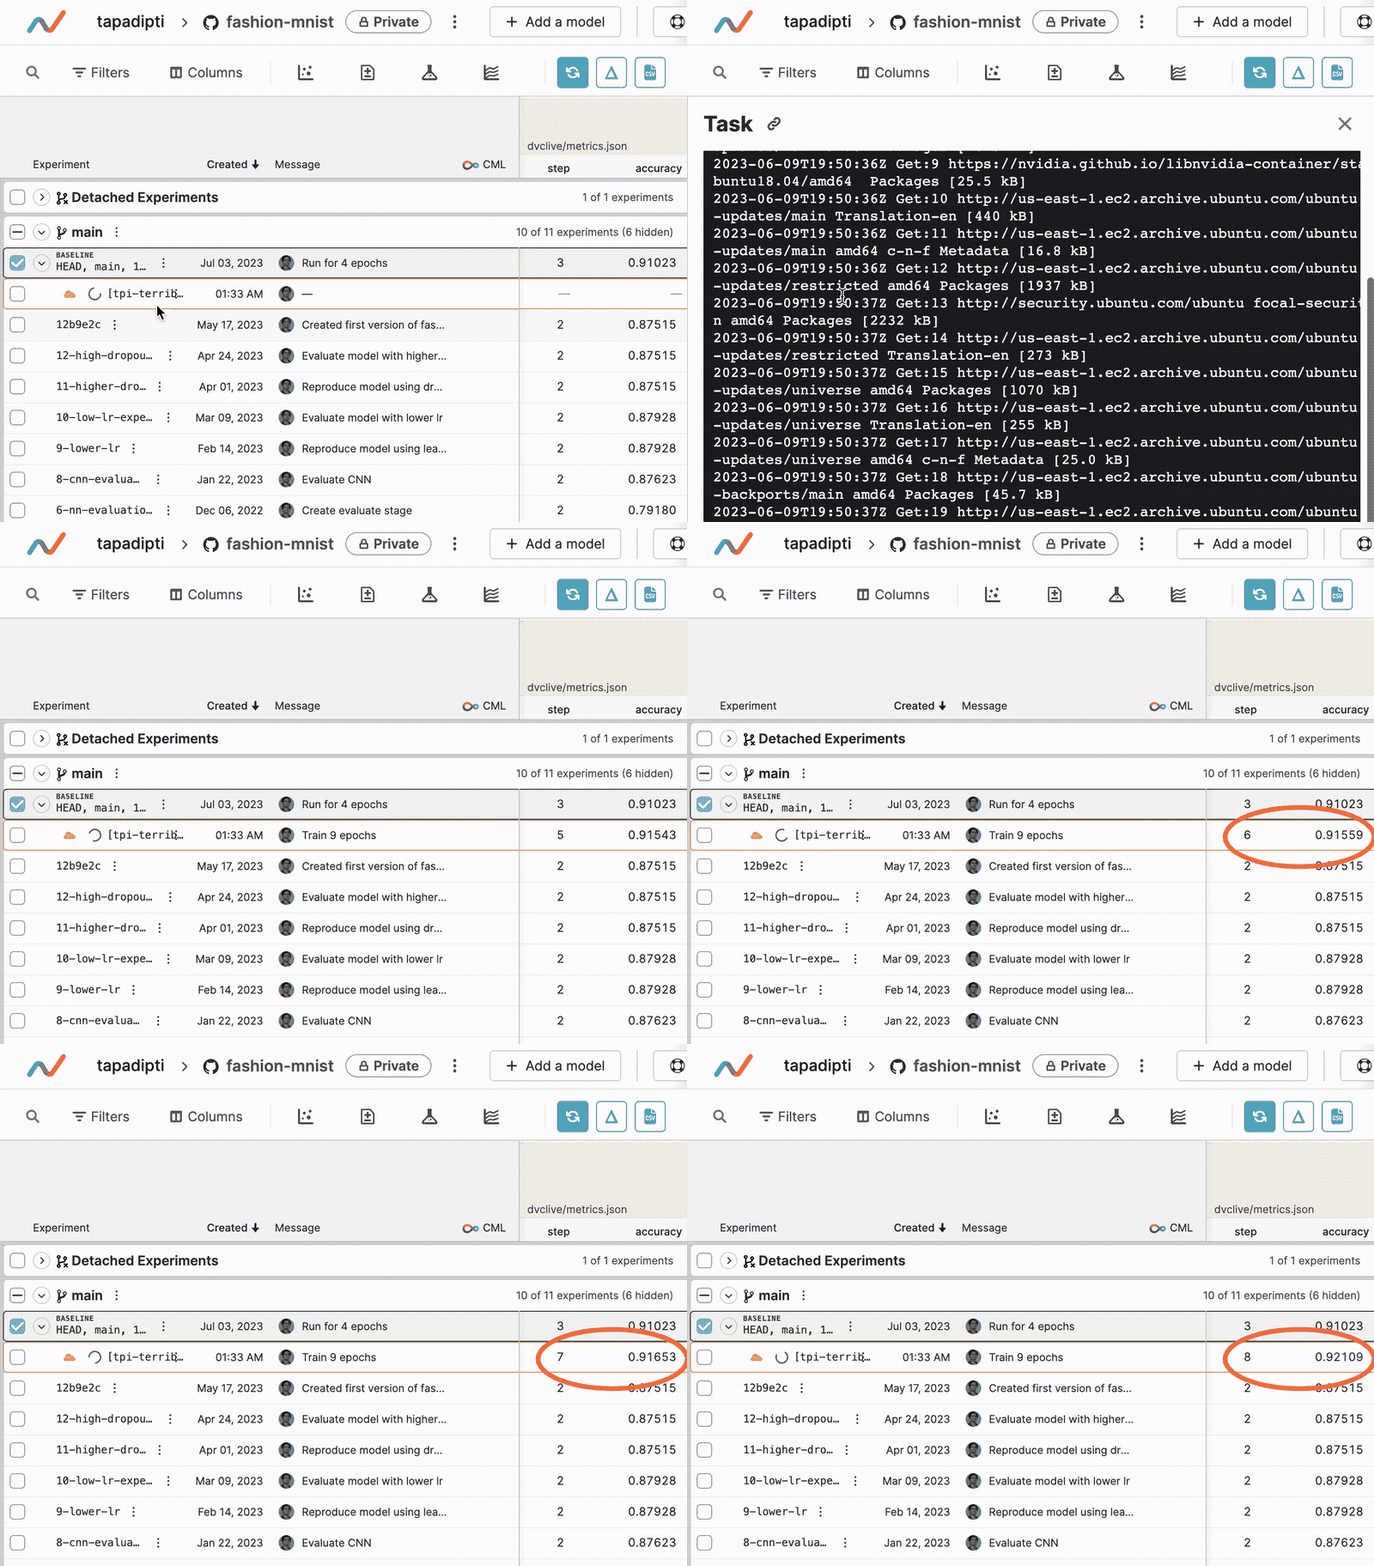
Once you submit an experiment, Iterative Studio creates the cloud instance and runs the job script. A new row is created in the experiments table under the original Git commit. Live updates to metrics and plots generated by DVCLive will show up in this row, and you can click on the experiment name to view the status and output log of the running experiment task.
Manage a completed experiment
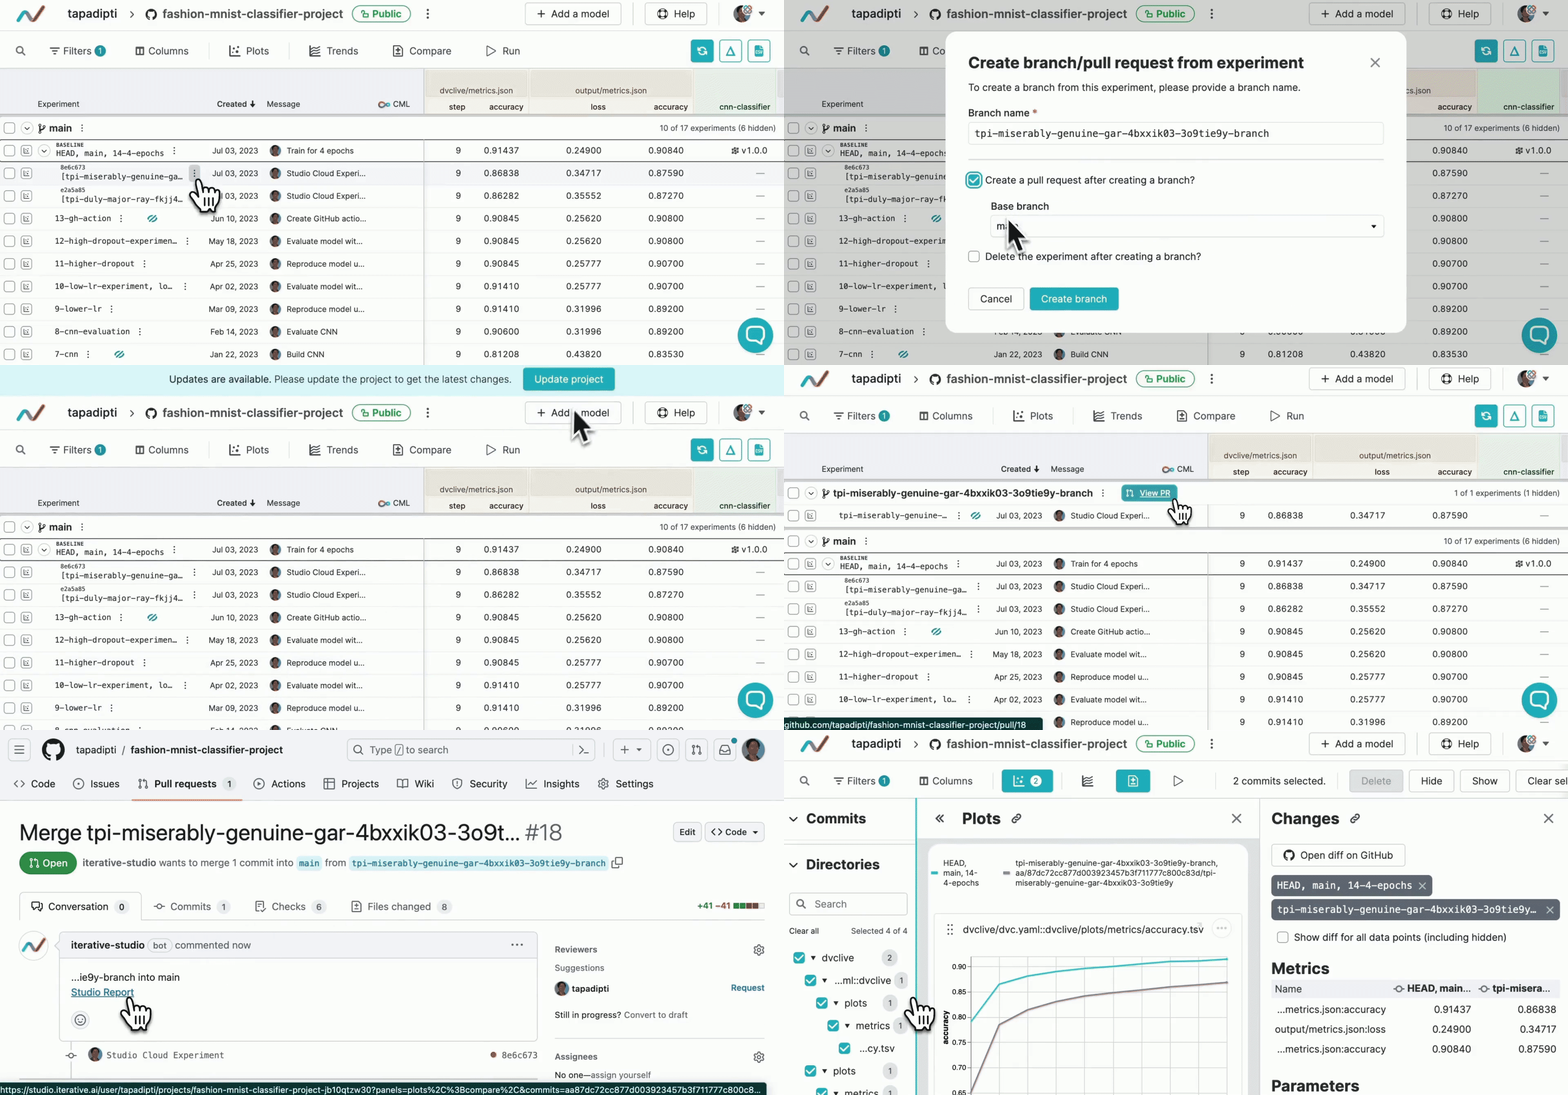
When the experiment completes, the files (including code, data, models, parameters, metrics, and plots) are pushed back to your Git and DVC remotes.
In Iterative Studio, you can create a branch and pull/merge request from the completed experiment, so that you can share, review, merge, and reproduce the experiment. In the pull/merge request, Iterative Studio automatically inserts a link to the training report. So your teammates who are reviewing your PR can quickly and easily compare your experiment with its baseline.
CI-Based experiments
Iterative Studio can also use your regular CI/CD setup (e.g. GitHub Actions) to run the experiments. To enable this, do the following:
-
First, integrate your Git repository with a CI/CD setup that includes model training process. You can use the wizard provided by Iterative Studio to automatically generate the CI script, or you can write it on your own.
-
Then, setup the yaml workflow environment variables as secrets. This is needed so that your CI workflow can launch the runner in your desired cloud provider.
-
Now, submit your experiments from Iterative Studio. Each submission will invoke your CI/CD setup, triggering the model training process.
Use the Iterative Studio wizard to set up your CI action
Select a commit and click Run. You will see a message that invites you to set up your CI.
The CI setup wizard opens as shown below.
This wizard has the following two sections, pre-filled with default values:
-
Left section with 2 sets of parameters:
-
Configuration of your self-hosted runner, which is used in the
deploy-runner
step of your CI workflow. The parameters listed here are a subset of the parameters for CML self-hosted runners.Parameter Meaning Spot
Whether you want to launch a spot cloud instance, cutting down the costs of your training. Cloud
Your cloud provider. Region
Cloud-vendor specific region or a CML synthetic region (an abstraction across all the cloud vendors). Type
Cloud-vendor specific instance type or a CML synthetic type M
/L
/XL
(an abstraction across all the cloud vendors).Type
is also tied to GPU behavior. If you choose an instance with a selectable GPU (such as a CML instance type or any GCP instance), theGPU
parameter will show up.HDD size
Hard disk size in GB. We highly recommend you to enter a big enough value (eg, 100) to avoid unexpected runner termination due to hard disk exhaustion. Reuse
Values for the CML flags reuse
andreuse-idle
. See all CML options for detailsLabels
Text labels to identify your CML runners from other self hosted runners that you might have. -
Job script, which is used in the
runner-job
step of your CI workflowParameter Meaning Job script
This is the script needed for your runner to execute your job, which would commonly include training your model. The default template is a very common combination of CML and DVC taking into account that DVC enables you to make the most of Iterative Studio. You can update this script to reflect your exact model training process, whether you use DVC or not.
-
-
Right section which displays the generated yaml to be used in your CI set up. It reflects all your input parameters. Use the
Copy to clipboard and paste in your CI Workflow file
link to copy the generated yaml and create your CI script.
That's it! At this point you should have CML in place within your CI/CD to run your experiments. Now, you can submit your experiments.
Submit a new experiment
Watch this video for an overview of how you can run CI-based experiments from Iterative Studio.
Note that we have renamed DVC Studio mentioned in the above video to Iterative Studio and Views to Projects.
To run experiments from Iterative Studio, determine the Git commit on which you
want to iterate. Select the commit and click the Run
button. A form opens,
with 2 types of inputs that you can change:
Input data files:
You can change datasets that are used for model training. The list of files that
you can change will depend on your ML project. For instance, in the
example-get-started
ML project, an authorized
user can change the data.xml
file. Iterative Studio identifies all the files
used in your ML project, which means that if you select the
Show all input parameters (including hidden)
option, then you can also change
the hidden files such as the model.pkl
model file and the scores.json
metrics file. You can also choose not to change any input data files if you only
wish to change the values of one or more hyperparameters.
Hyperparameters:
Iterative Studio lists all the hyperparameters of your ML project and you can
change their values as per the new experiment that you want to run. For
instance, in the example-get-started
ML
project, an authorized user can change
max_features
(the maximum number of features that the model uses), ngrams
,
etc. You can also choose not to change any hyperparameters if you only wish to
change one or more input data files.
The default values of the input data files and hyperparameters in this form are extracted from your selected commit.
Enter commit details and submit the CI-Based experiment
Once you have made all the required changes, enter your Git commit message and description.
If your CI job creates a new Git commit to write the experiment results to your
Git repository, you may want to hide the Git commit that you created when
submitting the experiment from your project table. In this case, add
[skip studio]
in the commit message. For details, refer to Display
preferences -> Hide commits.
Select the branch to commit to. You can commit to either the base branch or a new branch. If you commit to a new branch, a Git pull request will automatically be created from the new branch to the base branch.
Click on Commit changes
.
What happens after you submit a new CI-based experiment
Git commit (and pull request) are created: Iterative Studio will create a Git commit with the changes you submitted. This commit appears in the project table. If you had specified a new branch to commit the changes to, then a new pull request will also be created from the new branch to the base branch.
Model training is invoked: If your ML project is integrated with a CI/CD setup (e.g. GitHub Actions), the CI/CD setup will get invoked. If this setup includes a model training process, it will be triggered, which means that your ML experiment will run automatically.
The model training can happen on any cloud or Kubernetes. For more details on how to set up CI/CD pipelines for your ML project, refer to CML.
Live metrics and plots are tracked: In your model training CI action, you can use DVCLive to send live updates to metrics and plots back to Iterative Studio, without writing them to your Git repository. The live metrics are displayed alongside the corresponding experiment commits.
Metrics, plots and reports can be saved in Git: In your model training CI action, you can save the training results in Git. This means, once the experiment completes, its metrics will be available in the project's experiment table. You can then generate plots and trend charts for it, or compare it with the other experiments.
In your model training CI action, you can also use CML to create reports with
metrics, plots or other details. You can access the CML report by clicking on
the CML report
icon next to the Git commit message in the experiment table.
The CML Report
tooltip appears over the CML report
icon on mouse hover.